6/30/07

More "crowning" around...


Can't seem to stop myself from making crowns with fancy papers, velvet leaves, flowers and of course, lots of glitter! This one's off to a shop on the other side of the country to bring glittery goodness to another unsuspecting diva!


Off to the beach...see you all soon!


Yours in glitter,


Laurie

6/27/07

Take five minutes for a quick summer note!


I am personally trying to revive the art of note writing by making beautiful cards to inspire taking pen to paper. In these frantic times of no time, emailing and cell phones, it takes a real effort to sit down, collect one's thoughts and actually write to someone.
I use the finest papers I can find, hand stamp & glitter each one, then sign and date them on the back. I've made these particular cards for some of my retail stores whose clients appreciate something handmade. I never know what combination of paper stock, ink, stamp and glitter I'll use and many are one of a kind.


I hope they inspire you to take a moment, dig your feet into the sand and drop a note to a special friend. Better yet, make a card yourself to make it even more special...
A handmade tag can really jazz up a bottle of wine, bouquet of flowers or any gift.

6/26/07

Glittery Sea Star Wedding Favors

After the wedding, there wasn't a single one left...and I made way more stars than there were people! Guess they liked them!

And...here's how they looked on the table, although at the beginning of the meal, they were propped up against the wine glasses. Very pretty. This pix was taken after the first glass of wine! Oops! Just a BIT blurry!!! Honest, I didn't drink the wine!!! But I did partake in a teensy-weensy taste of champagne.....mmmmmmm!


( I'm a sucker for anything wrapped up in cello! )

By the way, these are real sea stars that I glitter in seasonal colors, set with an eye hook ( so you can also use as an ornament with the hand-forged hook ) and pop into cello with a custom banner. This banner said "Love Joy Peace".

I sell tons of them yearround, but these are my summer colors: lime green, pale blue and blue-white. I do have about a gazillion different colors...but used only three for this event. Her flowers were chartreuse and shades of white. Roses, peonies, hydrangia, stock, lime green frilly stuff...To DIE for.....

There were lots of little tufts of cello bags sticking out of ladies purses...Makes a girl...er...Glitter Fairy... proud!

p.s. Sea star ornaments also look swell on the Christmas tree or mantel, glittered in golds, bronzes or silvers. I also sell them at the Holidays. ( see my etsy store )

Ta ta for now...

6/21/07

It's Suuuuumertime...make some faux flower tea lights

Here's a fun & easy summer project. Now that the weather is warm, it is time to eat supper out on the terrace, deck or picnic table. Faux flower tea lights are easy and fun to make! Group a bunch of them together on your dinner table and they will safely cast a warm glow ...and if you make enough of them, you can actually see your dinner!


I found very cool faux tea lights at the craft store. I know you can't really see the light in this picture, but don't worry, it's in there! They are little white round thingies with a plastic flame on top & are powered by little replaceable batteries. They flicker a bit like real candlelight and if you place one inside a faux flower, it makes a wonderful bit of light to eat dinner by.


Take the fluffiest faux flower you can find and pull it off the stem. (No, this doesn't hurt!) The one above is a white peony. Next, separate the petal layers, keeping them in order. Each petal circle will have a small hole in the center which you have to enlarge by making an "X" with an exacto knife.

Starting with the largest petal circle facing up , insert the plastic flame into the hole (from the bottom) , pushing petal down to the base of the flame. Add each layer until the flower is complete. You don't even need to glue them in place. You can , however, hot glue some leaves underneath the flower if you like. I almost forgot to tell you to add a glittered bumblebee to the flower. Just wind its wire stem around a thin cylinder such as a thin paintbrush, to make a coil and leave a straight section at the end farthest from the bee. Put a dab of hot glue inside the flower and stick the straight end of the wire into it and hold it for to seconds until the glue sets. Now your bee is hovering over the blossom and the coiled wire gives it a special "boing"!

The tealight has a little switch on the base which turns it on and off. Each will light up for about 7 hours or so. Be sure to pick up an extra batch of batteries.

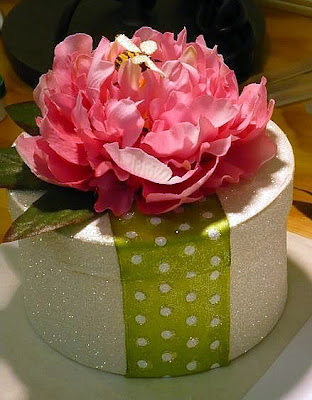
I can't seem to keep myself from making little boxes with flowers and bees on top. This is a small oval box with three flowers clustered on top & a glittered bumblebee, of course! I filled it with dried lavender so it not only pleases my eye, but my nose, too!

6/14/07

All hail, the queeeeeeen!

The Glitter Fairy has been dreaming up new glittery surprises...and voila! Crowns! The one above is for the "Queen Bee", perfect for a birthday party or special occasion for that DIVA in your life---that could be YOU!!!
I couldn't resist putting a glittery silvered bumblebee right smack in the middle! It's trimmed with vintage tinsel, rhinestones and a gazillion yards of lavender silk ribbon (actually...7 yards each side X 2 types of ribbons= an over-the-top 14 yards! Can't have too much silk ribbon - or glitter- I always say!)


The back is covered in beautiful pink swirly paper, with a banner for you to write something special and a spot for the Diva du Jour's name.


This pink crown above is my dragonfly crown. A beautiful silk flower is being visited by a glittered champagne pink dragonfly. Rhinestones, tinsel & ribbons complete the front, and the back has a place for your name. I handwrote "Made by the Glitter Fairy" in the banner.

Crowns can make a dreary day sparkle, a child giggle and a 40th birthday party rock! And what FUN to make.

I will be doing a "Diva du Jour Crowns" workshop soon so stay tuned...I will also be selling these soon at the studio and at my etsy store.

I may have trouble parting with them, however!!!!!


You can't help but feel SPECIAL with one of these babies on your head!

6/6/07

You're really not gonna believe this....

Just for the heck of it, I watched the promo for tomorrow's Martha show, just to see if I was really going to be on. There I was, in all my glittered glory...YAY!!!...but then, I clicked on the Friday promo preview and there was Joan Rivers (hey, wasn't she on the other show I was on???)...and...guess what??? This is really wierd! Yup, little ol' me will be on Friday's show, too! ( Must be a really slow news week...)

I am just blown away...two days in a row on national TV...
The Glitter Gods are really, really, really smiling down on me.
Can't really absorb it. But what fun! Glitter Rules!
See ya tomorrow at 10am.
See ya Friday at 10am.

We love reruns!

Holy hamburger, I'm on Martha again!!!!!

Imagine my surprise this morning as I was eating my breakfast while watching The Martha Stewart Show, when suddenly I saw myself in a promo for Thursday's show!!!!! I nearly choked on my toast! It's rare that I actually watch TV in the morning, but tuning in just as my face flashed across the screen was just too wild!!! So if you missed it last time on April 4th, here's your chance to chuckle as the glitter flies with Martha. We made glittered bunny centerpieces and cabbage baskets. Here's the link to the promo... Just click at the top on the Thursday June 7th show to watch the preview.

I am so blessed to be given this wonderful exposure. Martha has been so good to me. She's "A Good Thing" in my book!

Glitter 101 Workshop


What fun we had last Saturday in Seymour! Seven terriffic ladies joined me for an afternoon of glitter, flowers, bumblebees and glittered cupcakes!

I shared everything I know about my favorite material, glitter, and together we made flower & bumblebee trinket boxes, glittered monogram letters and cards & tags. What a great bunch of glitter girlz...


These gals (below) even came all the way up from Texas. (They win the award for travelling the greatest distance!)

The afternoon flew by as we picked flowers for our trinket boxes.


We painted, glued and glittered!

These glitter chix and their mom ( below ) were soooooo cute!

A good time was had by all, especially ME, and I can't wait to do it again. More workshops are coming so stay tuned!
A special thank you goes to Bronwyn Evans, who graciously hosted this workshop in her gallery, Zoe & Floyd. She won't soon forget this day, and try as we might to clean up each and every flake of glitter, there will always be a trace of me...The Glitter Fairy leaves a trail!

6/4/07

Spring Gift Tags sprinkled with You-Know-What...

Made up a new batch of gift tags yesterday in Spring greens, pinks and blues, perfect for that little present for someone.


I'll be taking these to a great little shop in Wilton, CT, Stewart Flowers & Gifts, where they sell my cards and other seasonal products. They have wonderful flowers as well as gifts for the gardner, soaps, candles, urns and lots of other nifty home accents. Stop by and tell them "The Glitter Fairy" sent you!


6/1/07

Gloriously glittery & green...

Aren't they scrumptious? I love doing monogram letters and stringing them up on silk ribbons.

They're fun and great for the bulletin board, as a gift or wine bottle tie-on... or just to hang somewhere in your world. ( On a mirror, in a window, on your Christmas tree... ) These are for a client of one of the stores that carry my stuff. I know a little girl who is gonna have a big smile on her face soon!


By the way, now we're down to 6 days til Jennifer's Jen-o-licious SisBoom show! Click here for her website where you can see all her yummy designs. Do try to stop by. It is waaaaay too much fun! Not only will you get to see the one-and-only Jennifer, you'll see George, her incredible ( and gorgeous ) dog!

Oh yeah, there's great stuff there to buy, too! Maybe I'll see you there!

C-ya